A brick or stone project needs two measurements: the surface you want to cover and the usable coverage supplied by the exact product. A package count, an attractive photograph or a scale label cannot supply both. A short coverage record helps you compare options while keeping uncertain details visible.
This guide covers quantity planning for a separate dollhouse surface project. JNS unfinished plywood shell concepts retain their plain, raw inside-and-outside scope. Surface materials discussed here are separate project choices.
1. Identify the form of material before doing the arithmetic
Start with the exact product name and SKU. Record whether the supplier describes individual pieces, a connected sheet, a printed surface, a compound or another format. Keep that description beside its coverage information. Different formats need different quantity calculations.
A title containing a number may suggest a package size, but confirm what that number means. A piece count alone does not establish covered area: you also need the relevant face size, spacing and layout. Similarly, a sheet’s outside measurements may differ from the portion you can use after matching edges and making cuts.
When browsing miniature brick and stone materials, keep each candidate’s own information separate. A specification from a similar-looking item is a question to investigate, rather than a substitute for the selected SKU’s details.
2. Make a surface schedule
Give each surface a simple label, such as front wall, left return or chimney face. Measure its actual model dimensions in one consistent unit. Include the measurement date and the drawing or model revision, so a later change does not silently leave an old total in your notes.
For a rectangle, multiply width by height. Divide a more complicated outline into manageable shapes and record their areas separately. Label any approximate section. Measure openings and areas that will stay uncovered, checking that you do not subtract the same opening twice.
The retailer-authored Miniatures.com Bricks & Stone guide describes measuring covered areas and using patterns for its mesh-backed brick examples. A paper pattern is also a useful planning aid for an awkward outline. Confirm the selected material’s cutting and application instructions separately.
3. Keep area, length and scale separate
A wall measurement is a length; coverage is an area. Write square inches or square centimetres beside every area total. If one figure is in square feet and another in square inches, convert them before comparing: one square foot is 12 inches by 12 inches, or 144 square inches.
Use the miniature’s physical measurements for this calculation. A wall already measured on your model does not need to be divided by its scale ratio again. The scale label remains useful when judging the appearance of the brick pattern or components, alongside their stated physical dimensions.
For the broader room layout, keep the coverage record with your dollhouse room plan. A change to a doorway, return wall or access panel can change both the shape and the amount of material required.
4. Use a clearly labelled example
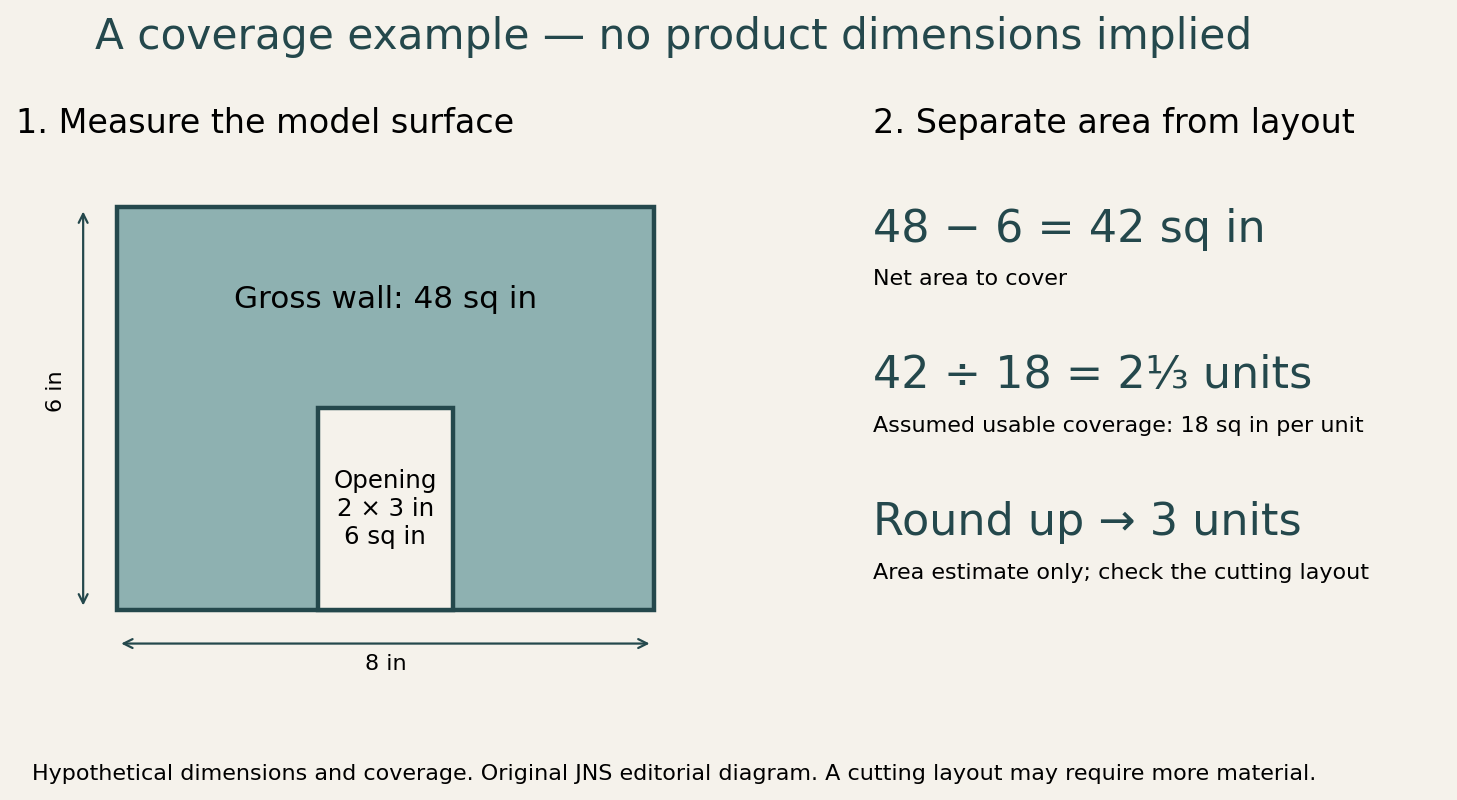
Consider a hypothetical model wall 8 inches wide and 6 inches high. Its gross area is 48 square inches. A hypothetical opening 2 inches wide and 3 inches high removes 6 square inches, leaving a net area of 42 square inches.
If a hypothetical product supplies 18 usable square inches per purchasing unit, 42 divided by 18 is about 2.33 units. Rounding up gives three units as an area-based starting estimate. These numbers describe an arithmetic example, not the dimensions or coverage of a JNS product.
Three units would supply 54 square inches by that assumed coverage figure. The remaining 12 square inches are an area difference, not proof that every necessary cut fits. Pattern direction, narrow strips or unusable offcuts could change the purchasing decision. Keep the area estimate and the cutting-layout decision as separate entries.
5. Record why you need an allowance
List the reasons material might be consumed beyond the net area: trial pieces, pattern alignment, cuts around openings, damaged pieces or a small reserve for later repairs. Choose an allowance after reviewing the particular product and layout. A universal percentage can hide the very differences you are trying to understand.
For compounds, coverage may depend on application. Bromley Craft Products’ Realistic Brick Compound page describes its coverage as approximate and dependent on factors including thickness. That is a reason to retain the supplier’s conditions beside the estimate. It does not establish coverage for a different compound or any JNS SKU.
For sheets or individual components, sketch the intended arrangement and identify which offcuts are genuinely reusable. Keep special corners, edging and returns on separate lines if they are different products. Do not silently count a straight piece as a confirmed substitute for a corner component.
6. Leave missing coverage blank
If a listing gives a package count but no reliable area or component dimensions, record the gap. Ask about the exact SKU, units, usable coverage and any spacing assumptions. If two sources disagree, retain both figures with their sources until the discrepancy is resolved.
A useful estimate shows its limits. Write “coverage awaiting confirmation” rather than inserting a measurement from a photograph or borrowing another product’s figure. Keep material composition, adhesive compatibility and installation directions in their own fields; a completed area calculation does not answer those questions.
7. Keep one compact purchasing record
- Project and revision; surface labels; measurement units.
- Gross area, excluded openings and net area for each surface.
- Exact product name, SKU, material format and dated specification source.
- Confirmed usable coverage per purchasing unit and its conditions.
- Allowance, its reason, layout notes and separately counted components.
- Calculated units, unresolved questions and the quantity you eventually choose.
Check current price, availability and delivery separately when you are ready to order. This worksheet is a planning record, not a stock reservation or confirmation that different products can be used together.
8. Recheck after a design change
When the model or material choice changes, revise the affected surface lines and calculate again. Retain the earlier version rather than mixing old dimensions with a new coverage figure. Keeping the source, measurement and decision together makes the estimate easier to review and reuse for the next stage of the project.
